
In today’s digital landscape, safeguarding your online presence is crucial. When you connect to a VPN, all your data undergoes encryption and secure tunneling before traversing the internet. This mechanism shields your personal details from potential theft or surveillance by unauthorized parties. In this comprehensive guide, we’ll walk you through the process of utilizing a VPN on your smartphone, including detailed steps on how to activate and deactivate it on both iPhone and Android devices in an efficient and thorough manner.
Comprehensive Guide to Using VPN on iPhone
Step-by-Step Instructions for Installing VPN on iPhone
Setting up a VPN on your iPhone enhances your privacy and allows access to restricted content. This process is straightforward and can be completed in just a few steps, ensuring your connection remains secure whether you’re browsing at home or on public Wi-Fi. Follow these detailed instructions to get started:
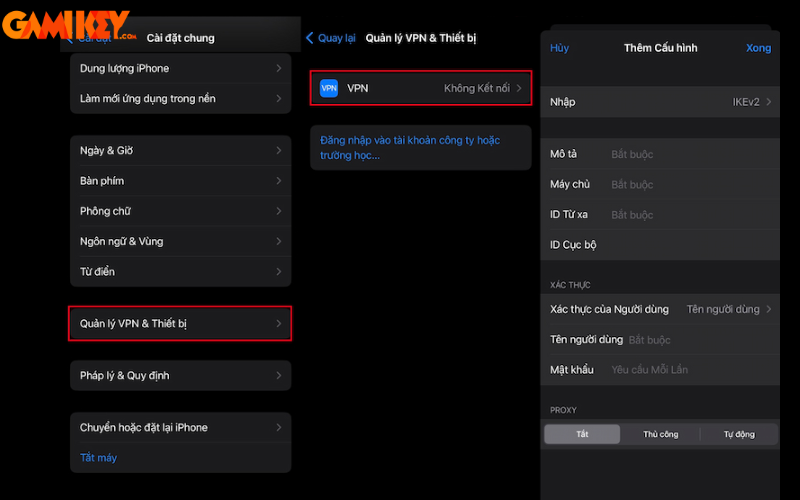
Step 1: Begin by opening the Settings app on your iPhone. Navigate to the General section, then scroll down to locate and tap on VPN & Device Management. This area houses all configurations related to network privacy and device oversight.
Step 2: Select the option to Add VPN Configuration. You’ll be prompted to input essential details such as the description, server address, remote ID, username, and password. Ensure accuracy in these entries as they are provided by your VPN service provider. Once filled, tap Done to save the setup.
Explore More:
What is VPN
How to Switch VPN on Various Devices
Step 3: To activate the VPN, simply toggle the switch to the on position, indicated by a green color. Your device will now route all traffic through the secure tunnel, providing encrypted protection. Remember, activating a VPN might slightly impact your internet speed due to the encryption process, but it significantly boosts security. For optimal performance, choose a reputable VPN provider with servers close to your location. This setup is particularly beneficial for users who frequently access sensitive information or travel abroad, where geo-restrictions might limit content availability. By implementing these steps, you’re not only protecting your data but also gaining the freedom to explore the web without boundaries.
Detailed Process for Disabling VPN on iPhone
There are scenarios where you might need to turn off your VPN, such as troubleshooting connectivity issues or accessing local services that block VPN traffic. Disabling it is quick and ensures you can revert to your standard connection effortlessly. Here’s how to do it step by step:
Step 1: Launch the Settings application on your iPhone to access the main configuration menu.
Step 2: Scroll through the list and select the VPN option, which manages all active virtual private network connections.

Step 3: Identify the active VPN connection you wish to deactivate from the list of configured profiles.
Step 4: Switch the VPN status from enabled to disabled by toggling the control. This action will immediately cease the encrypted tunneling, restoring your direct internet connection. It’s worth noting that disabling the VPN can be useful for streaming services that detect and block VPN usage, or when you need maximum speed for downloads. Always ensure you’re on a trusted network before turning it off to avoid exposing your data. If you frequently switch between VPN states, consider using shortcuts or widgets for quicker access, making your mobile experience more seamless and secure.

Removing a VPN Configuration from iPhone
Step 1: Access the Settings menu on your device to begin the removal process.
Step 2: Proceed to the VPN section within the available options to view all setups.
Step 3: Choose the specific VPN profile you intend to eliminate from the list.

Step 4: Tap the Delete VPN button located at the bottom of the screen to initiate removal.
Step 5: Confirm the deletion by selecting Delete in the pop-up dialog. This permanently removes the configuration, freeing up space and simplifying your settings. Removing unused VPN profiles is a good practice to maintain device efficiency, especially if you’ve tested multiple providers. After deletion, you can always add a new one if needed. This flexibility allows users to experiment with different VPN services to find the one that best suits their needs, such as speed, server locations, or additional features like ad-blocking.

In-Depth Tutorial on Implementing VPN on Android Devices
Configuring Built-In VPN on Android Phones
Android’s operating system comes equipped with native support for VPN protocols like PPTP and L2TP, enabling users to establish secure connections without relying on third-party applications. This built-in functionality simplifies the process and integrates seamlessly with your device’s network settings. To set up a compatible VPN network, adhere to these expert-guided steps:
Step 1: Open the Settings app on your Android device. Under the Wireless & Networks category, tap on More to expand additional options.
Step 2: From the expanded menu, select VPN, and then choose to Add a VPN Network to begin configuration.

Step 3: Enter the required information for your VPN, including the name, type (such as PPTP or L2TP), server address, and any security settings. Save the configuration once complete. With this setup, you can now connect by selecting the network from the VPN menu, entering your credentials, and tapping Connect. This native support is ideal for users seeking simplicity without extra apps, though for advanced features like kill switches or multi-hop connections, dedicated VPN apps might be preferable. Understanding these protocols helps in choosing the right one: PPTP is faster but less secure, while L2TP offers better protection at the cost of speed. By mastering this, you empower yourself to maintain privacy in various scenarios, from public hotspots to restricted networks.

Now that your VPN is configured, connecting is as simple as selecting it from the list and authenticating. This ensures all your online activities are encrypted, protecting against eavesdroppers and enabling access to global content libraries. For instance, if you’re traveling, a VPN can simulate a connection from your home country, unlocking familiar streaming services.
Enabling Always-On VPN Mode on Android for Continuous Protection
Since Android 4.2, the platform has included an “Always-On VPN” feature, which mandates that all internet traffic routes through the VPN tunnel. This is particularly advantageous for those who rely on public Wi-Fi, as it guarantees persistent security without manual intervention. Activating this mode prevents accidental exposure of your data if the VPN disconnects unexpectedly.
To enable Always-On VPN for a specific network, follow these precise steps:
Step 1: Navigate to the VPN settings on your Android device and locate the desired VPN profile. Tap the gear icon next to it to access advanced options.
Step 2: Slide the toggle for Always-On VPN to the activated position. This ensures your device blocks non-VPN traffic, enhancing security. This feature is a game-changer for privacy-conscious users, as it automates protection and minimizes risks in unsecured environments. However, be aware that it might consume more battery due to constant operation, so monitor your device’s power usage. Combining this with battery-saving modes can optimize performance.

Turning Off VPN on Android Operating System
Step 1: Unlock your phone and head to the Settings app, then select Connections & Sharing for network-related controls.
Step 2: Scroll down to find and tap on the VPN entry in the menu.
Step 3: Long-press the active VPN connection and choose to Disconnect. This reverts your traffic to the standard pathway. Disabling can resolve issues like slow loading times or incompatibility with certain apps, allowing for a more fluid experience when security isn’t the primary concern.

Cách tắt VPN trên Android
Key Advantages of Disabling VPN When Necessary
While VPN usage offers robust security and privacy benefits, there are times when deactivating it can provide distinct advantages, optimizing your device’s performance in specific situations:
- Enhanced Speed: The encryption and rerouting through remote servers can introduce overhead, potentially slowing down your connection. Turning off the VPN allows for direct, faster access to the internet, ideal for bandwidth-intensive tasks like video calls or large file transfers.
- Improved Stability: Occasional connectivity glitches or interruptions from VPN servers might disrupt your online activities. Disabling it can lead to a more reliable and consistent internet experience, especially on stable home networks.
- Reduced Latency in Gaming: For online gamers, VPN overhead can cause noticeable delays or lag. Switching it off ensures smoother gameplay, lower ping times, and a competitive edge in real-time multiplayer scenarios.
This guide covers everything you need to know about effectively managing VPN on mobile devices, from setup to deactivation. We hope these insights empower you to handle your VPN configurations with confidence. For more in-depth resources on virtual private networks, check out our Software section!
>>> Discover Additional VPN Articles from buyaitools:
Purchase ExpressVPN Account
Buy NordVPN Subscription
What is Turbo VPN
Installing VPN on Windows 10
Top 5 Best VPN Services
Delving deeper into the world of VPN technology, it’s essential to understand why these tools have become indispensable in modern digital life. A VPN, or Virtual Private Network, creates a secure connection between your device and the internet by encrypting your data and masking your IP address. This not only protects against hackers and snoopers but also allows you to bypass geographical restrictions, access censored content, and maintain anonymity online. For mobile users, this is particularly valuable given the prevalence of public Wi-Fi networks, which are often vulnerable to attacks like man-in-the-middle interceptions.
When choosing a VPN for your smartphone, consider factors such as encryption standards (e.g., AES-256), no-logs policies, server diversity, and speed performance. Reputable providers like ExpressVPN or NordVPN offer mobile apps that simplify the process beyond built-in options, including features like automatic server selection and split tunneling. Split tunneling, for instance, lets you route some traffic through the VPN while allowing others to go directly, balancing security with performance.
On iPhones, Apple’s ecosystem integrates VPN support deeply, supporting protocols like IKEv2, which is known for its stability and quick reconnection after signal loss—perfect for mobile use. When installing, always verify the provider’s credentials to avoid free VPNs that might log your data or inject ads. Post-setup, test your connection using tools like IP leak checkers to ensure no data is escaping the tunnel.
For Android users, the flexibility is even greater due to the open-source nature of the OS. Beyond PPTP and L2TP, you can explore OpenVPN or WireGuard via apps for superior security and speed. Always-On mode is a standout feature, acting as a fail-safe that blocks internet access if the VPN drops, preventing accidental data exposure. This is crucial for professionals handling sensitive information on the go.
Disabling or removing a VPN should be done thoughtfully. For example, if you’re experiencing high latency, diagnose whether it’s the VPN or your base connection by running speed tests with and without it. In gaming, low-latency servers or disabling the VPN can make a significant difference, but remember to re-enable it for non-gaming activities to stay protected.
Beyond basic usage, advanced tips include setting up VPN on routers for whole-network protection, using it for secure torrenting, or combining it with antivirus software for layered defense. Be aware of legal aspects: while VPNs are legal in most countries, using them for illegal activities isn’t. In regions with heavy censorship, like China, opt for VPNs with obfuscation to evade detection.
Troubleshooting common issues: If your VPN won’t connect, check for OS updates, restart your device, or switch servers. Battery drain can be mitigated by enabling only when needed or using lighter protocols. For privacy maximalists, consider paid services over free ones, as the latter often monetize through data sales.
In summary, mastering VPN on mobile empowers you to navigate the digital world safely and freely. Whether you’re a casual user or a security enthusiast, these tools offer unparalleled benefits when used correctly. Stay informed, experiment with settings, and always prioritize reputable providers for the best experience.